
Rewriting Git history : Being opinionated about Git
An opinionated guide to Git history hygiene, trunk-based development, and making source control easier for the next person who has to understand the repository.

This post reflects my view from 2018. The habits still matter, but many teams now rely more heavily on pull-request squash merges, branch protection, and automated checks.
In my short development career I've heard many different opinions on how to use Git the right way. There are a lot of times when the answer is "it depends" and can be daunting for a new user getting started on Git. I've picked on some tips to make my source control habits nicer which I'll mention below. Everyone's workflow is different but here are my tips on maintaining source control so when a new developer joins your team they won't be confused on where to start.
Learn the git CLI
Don't get me wrong, Git GUIs are nice and offer a lot of features that will feel very clunky if you used the cli such as comparing diffs, reversing hunks or just looking at the history. A GUI will be sufficient if all you're looking to do is commit and push. Git has a lot of other tools to offer and the cli is your friend when working with the history and not the content itself.
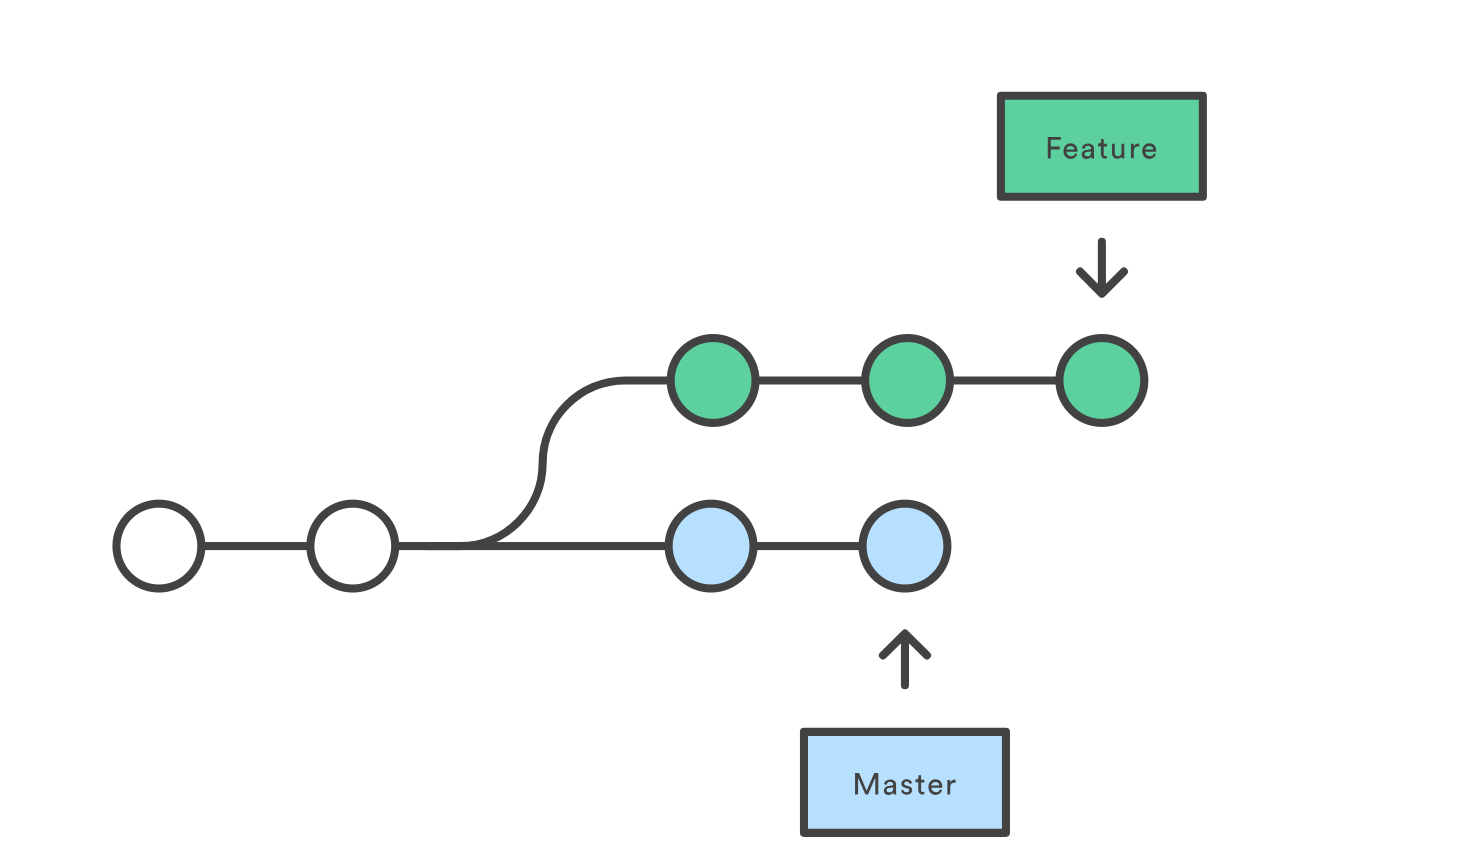
Trunk based development
To give a bit of context the master or trunk is where the production ready code should live and is the branch that is checked-out by default if you clone a new repository. There have been multiple occasions in which I've cloned a git repo looked at the history and there is a develop or a release branch which is 100 commits ahead of master which was last updated 2 months ago with code that doesn't even compile anymore due to outdated dependencies or no historical context of which branch I need to be using.
It raises so many questions such as:
- Are we not using master anymore?
- Is the branch deprecated?
- Do I just reset master to the current
head?
Trunk Based Development is a workflow defined as "a source-control branching model, where developers collaborate on code in a single branch called ‘trunk’, resist any pressure to create other long-lived development branches by employing documented techniques. They therefore avoid merge hell, do not break the build, and live happily ever after." So create short lived feature branches that are integrated often so any future developers who join the project remain happy.
If you do want to keep track of releases, tag the commits that you have releases on. That is what tags are for.
Never commit to master directly
Following up on trunk based development, don't commit to master directly. Protect your master branch from abuses such as:
- "fixed typo"
- "Hack-v2"
- "resolving merge conflict"
Make your changes on hotfix/typo or feature/add-this-feature create a pull request and let other people review your code. Don't be scared, code reviews are nice. This also lets you run Tests your CI before it is merged so you can fix issues that may have been caused due to your change. If you use a remote source repository, you can physically protect your branch so no one can push to the source of truth.
Merge vs Rebase
Here comes the most discussed question about what is the right way of doing things.
Proof?
Always rebase instead of merge. It makes your history look nicer. Let the pull request create a merge commit into master. That is the only time you want a merge in your code.
git checkout mastergit pull origin mastergit checkout feature/feature-youre-working-ongit rebase mastergit push -f origin feature/feature-youre-working-on
git push -f AKA force push is used to overwrite the remote branch if there are any changes on your history such as you rebasing.
Note: This flag can cause the remote repository to lose commits; use it with care.
Now you may say isn't force push bad. If no one else is working on the same branch as you i.e. no long running branches then you shouldn't have to worry about force push. Knowing changes on your own branch and manipulating it is your decision and since master is protected you can't modify any release.
Commit messages
Write meaningful commit messages. Commit messages are important and can help new developers understand context of what changes were done. If using a backlog management system, link your commits to work items in your backlogs. Take advantage of the fact that you have a title and a body in your message. Be concise and everyone will love you.
Tools and useful commands
Throughout my journey with git, I have picked up commands that help me learn git, rewrite the history and make my life easier on a day to day basis.
Before we get started on commands, get this tool GitViz. You can put the path of any git repository and it will give you a live visual representation of the history and current state of the repository. It is great for a playground but don't use it as a full git UI tool.
I would also recommend cloning this playground git project that I created to simulate different scenarios that you may encounter. Create a blank project on GitHub and change the origin to the new blank repository by running git remote set-url origin {new repo url}
Alternatively you can you an in-browser tool from GitHub.
Merge to resolve conflicts
In this scenario we cover a change done on a feature branch that results in a merge conflict to master. To fix the conflict via a merge back:
git checkout mastergit pull origin mastergit checkout feature/merge-conflictgit merge master- resolve merge conflict
git merge --continuegit push origin feature/merge-conflict
this creates a commit Merge branch 'master' into feature/merge-conflict with the merge conflict resolution and if the branch is then merged back into master it starts to look very ugly

Rebase to resolve conflicts
An alternative to above is to
git checkout mastergit pull origin mastergit checkout feature/rebase-conflictgit rebase master- resolve merge conflict
git rebase --continuegit push -f origin feature/rebase-conflict
This changes the parent of your branch to the latest master and gives you a straight path to a pull request.

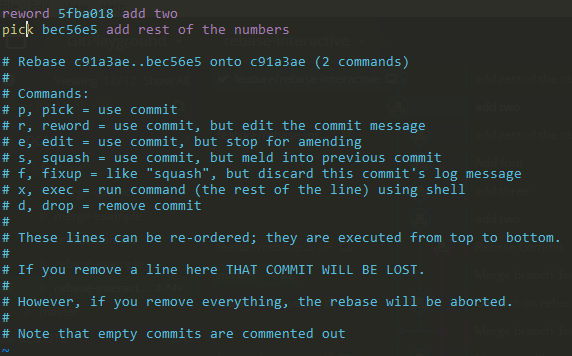
Interactive Rebase
Sometimes just resolving merge conflicts isn't enough. I am a big proponent of committing often however this can cause my feature branch to have many commits that won't make individual logical sense for reviewers to review.

In this example we will use interactive rebase and see how we can rewrite the branch history and group multiple commits into one logical commit so that reviewers have an easier time reviewing your pull request.
git checkout mastergit pull origin mastergit checkout feature/rebase-interactivegit rebase -i master
This will give you an output like this:
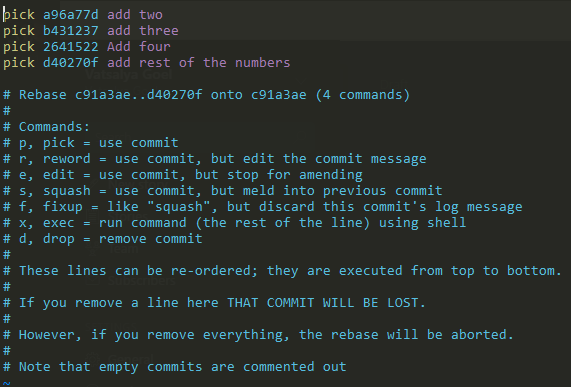
Each pick in the above image is a commit and as you can see, there are many small commits that I probably want to group into one commit
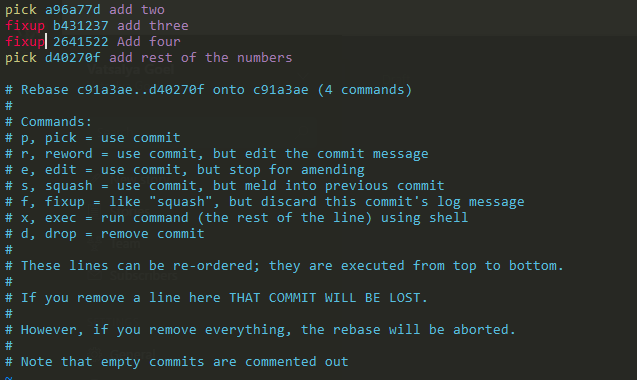
we can edit the above output to change pick into fixup which deletes the commit message and amends the changes into the commit above. Saving the file and exiting will apply the changes
git push -f origin feature/rebase-interactive
This results in a history like this

You will notice that even though the changes are merged the commit message is still add two so how do we fix the commit message. Use Rebase again
git checkout feature/rebase-interactivegit rebase -i master
This time instead of using fixup we use reword
Saving and quitting the file gives us another terminal output with the commit
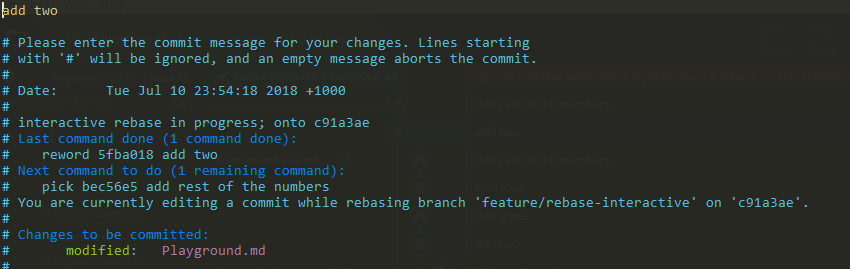
Lets change add two to add two, three and four

git push -f origin feature/rebase-interactive
Finally your history will look like:

In conclusion Git is a very opinionated topic and everyone is comfortable using git in a certain way. I hope that I was able to see the benefits of using certain git workflows to make your development life easier and keep the sanity of the person who takes on the source repository after you.